
In-field Observations: Small-Scale Roller Crimping
- Jul 20, 2021
- 5 min read
Updated: Aug 11, 2021

With the first season of North Jersey RC&D’s On-Farm Trials well underway, participating farmers are quickly mastering new techniques for maintaining and managing spring cover crops more sustainably. Vegetable growers participating in the study terminated their cover crops using roller-crimpers before planting their crops with no-till planters. North Jersey RC&D staff have been busy out in the field talking with these farmers about their experiences with roller-crimping for the first time and what lessons they’ve learned so far.
Plant a heavy stand, but even a late planting will produce a robust stand.
Plant a very heavy stand of cover crop early in the fall before you plan to roller-crimp, ideally at a rate of two or more bushels per acre. The thicker your cover crop planting and the lower your weed seed bank, the more successful your weed control will be the following season.
Many farmers, by necessity, cannot plant their cover crop until late October or early November. Cereal rye is very cold hardy and will respond well to late planting. The fields below were planted in early November. Although growth was pretty dismal early in the spring, by planting time in June, the cover crop was over 5' tall and produced an excellent mat of vegetation when rolled.

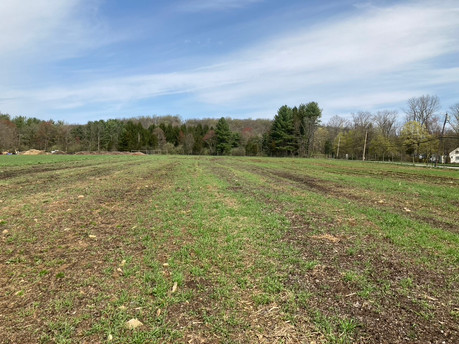


Rye cover crops planted in November. The first picture was taken in mid-April when there was still very little cover crop growth. By June the cover crop was over 5' tall and created a nice mat when rolled.
Carefully choose your cover crop mix.
Only several types of cover crops will successfully terminate when roller-crimped. Vetch, rye, and triticale crimp well. Neither clover nor annual rye --both commonly used cover crops-- will die when roller-crimped.
Cover crops alone won't suppress spring weeds; a pre-emergent herbicide is a must if you want clean fields.
Organic farmers who did not use any preemergence herbicide had weedy fields. The pictures below are from two organic farms; both farmers rolled a very thick (<2 bu/acre cover crop) at the proper maturity. In both cases, spring weed growth quickly overtook the crops to such a degree that yield will almost certainly be negatively impacted.
In an organic setting, working to reduce weed population the previous season is imperative. Organic farmers should expect a transition period when they first begin roller-crimping where weed pressure may be high. When transitioning to no-till, farmers should consider allowing for several seasons of reducing weed populations in fields they intend on roller-crimping.


Farmers who applied a single application of pre-emergent herbicide (in most instances a lower rate of Glyphosate) had excellent weed control and their cover crop residue appeared to suppress summer weed growth.


Lodging wasn't a big concern.
Farmers might be worried that cover crop that has lodged (fallen over before being planted) may be difficult to plant in. However, participants in the research trial had no issues planting into rolled mats where stems faced different directions. No wrapping occurred and the residue slicer cut through the residue cleanly.


Left to right: Lodged cover crop, rolled mat of cover, and cover crop after planting
Consider rolling the cover crop twice.
Farmers who had trouble terminating their cover crop with one pass reported more complete termination after the second round of roller-crimping.
Consider allowing the cover crop to completely die before planting.
Farmers who rolled and planted in one pass or on the same day reported poorer emergence than farmers who waited a day or more after roller-crimping to plant their cash crop. It could just be a coincidence, but you may want to consider waiting a bit longer if possible.
It is difficult to plant many varieties on a small scale.
Farmers had difficulty planting numerous varieties in one planting. Small quantities of seeds disappear into the meter, making it almost impossible to see how many seeds remain in the planter. Farmers trying to plant multiple varieties in one bed may find no-till planting challenging.
Transplanting is more challenging than seeding into no-till fields.
When first transitioning to no-till, farmers should try planting with a seeder. Transplanting seedlings into no-till fields can be very difficult -- farmers reported that soil was very firm and not conducive to this type of planting. However, the soil may soften and become less dense after several seasons of no-till. It's recommended to begin by seeding crops before attempting to transplant.
Fields need to be smooth and even.
A smooth, even soil surface is critical when using a no-till planter. Smooth surfaces enhance slot closure, consistent planting depth, and seemed to contribute to better emergence.
Make sure you have a well-outfitted no-till planter.
Farmers in this study are using small one- and two-row Pequea Planters. These small planters retail for between $6,000 and $10,000 and are rebuilt from older, larger John Deere Planters. Below is a list of possible components and the farmers' opinions of each:
SEED METERS: Farmers can choose between Vacuum Seed Meter and Finger Seed Meters. A vacuum seed meter is more expensive but significantly easier to adjust when changing seed type, size, and spacing. Changing the rate of a finger meter requires adjusting numerous gears and can be time-consuming, especially when planting many different varieties on a small-scale. However, farmers reported that the finger meters were very accurate and worked well, despite these drawbacks.


Left to right: Planter with vacuum seeder; gears on finger meter; seed box on planter
Row cleaners and Residue Slicers
Pequea offers planters with either standard row cleaners or a residue slicer. Residue slicers and row cleaners allow the planter to be used in fields where residue is thick and the soil is dense. Farmers report that both planter features worked well. The residue slicer cut, but did not move the residue from the seed slot. The row cleaners seemed to move the residue more effectively from the seed slot.


Closing Wheels
Farmers in the trial tried a number of different cast iron closing wheels which all seemed to perform well; no farmers reported any problems with wrapping. It is critical to upgrade from rubber to some form of cast wheel. When using a closing wheel with larger spikes, the tines should be angled in order to shed any entangled cover crop residue.


Left to right: Spiked closing wheels, flat closing wheels, and Posi-close wheels.
Fertilizer Openers
Fertilizer openers place fertilizer approximately 2 inches to the side and 2 inches below (2x2) the seed during planting. This starter fertilizer provides necessary N, P and K without risk of burning the seed or being subject to run-off and allows farmers to reduce overall fertilizer input.

Row Markers
Planting into thick residue can make it difficult to keep track of what's already planted. Farmers reported that foam markers were important tools for helping to keep rows straight. Markers can lay down lines or large, longer-lasting dollops of foam (a bubbly substance that dissolves within several minutes).

______________________________________
North Jersey RC&D On-Farm Trial is funded through USDA-NRCS’s Conservation Innovation Grant program. To learn more visit: https://www.northjerseyrcd.org/on-farm-soil-health-demonstration


Comments